HOW TO INSTALL FAUCET?
Attention
Before installing the new mixer it is essential that you thoroughly FLUSH through the supply pipes in order to remove any remaining swarf, solder or other impurities.
Failure to carry out this simple procedure could cause problems or damage to the workings of the mixer.
-
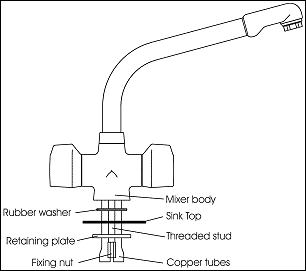
First screw the threaded stud into the mixer body.
-
Screw the copper tubes into the mixer body, and fully tighten.
-
Place the sink mixer in position to see if any alteration to the existing supply pipe-work is necessary.
-
After making any necessary alteration to the pipe-work, pass the rubber washer over the copper tubes and threaded stud to form a seal on sink top.
-
Pass the copper tubes and fixing stud through the sink with the spout retaining screw to the rear.
-
Slide the retaining plate up the copper tubes and secure screwing the fixing nut finger tight.
-
Check that the mixer body is correctly positioned and fully tighten the fixing nut.
-
The copper tubes at this stage will need to be gently turned outwards, then supported approximately halfway down and turned inwards, making two pipes parallel again but further apart thus making room for the couplings to be fitted.
-
It is recommended that 15mm x 15mm compression fitting should be used and/or, where required, 15x15mm compression check valves to connect mixer to hot and cold supply. Hot water should be connected to the left when viewed from the front.